In summary:
- Safe fermentation relies on “hurdle technology”—creating barriers (salt, acid, no oxygen) that pathogens like Clostridium botulinum cannot overcome.
- A salt concentration of at least 2% by weight is non-negotiable for initial safety, as it inhibits harmful bacteria and draws out water to create the brine.
- The process must achieve a pH of 4.6 or lower to be considered safe. This acidic environment is created by beneficial Lactobacillus bacteria.
- Not all surface growth is dangerous mold. Differentiating between flat, white Kahm yeast (harmless) and fuzzy, colored mold (dangerous) is a critical skill.
- Controlling temperature is key to texture and safety; ideal fermentation occurs around 70-75°F (21-24°C), while higher temperatures risk spoilage.
Diving into lacto-fermentation can feel like a leap of faith. You mix vegetables, salt, and water, then leave them on the counter, hoping for magic while fearing disaster. Many guides offer simple recipes, but they often leave out the most crucial part: the “why.” They tell you to use salt but not how it works as a microbial gatekeeper. They warn of mold but don’t clearly distinguish it from harmless yeasts. This approach turns a scientific process into a game of chance, leading to mushy pickles, off-flavors, and genuine safety concerns.
The key to consistent, safe, and delicious ferments isn’t a secret recipe; it’s an understanding of the underlying microbiology. The process is a managed battle, where you give beneficial bacteria—specifically of the Lactobacillus genus—a competitive advantage to defeat spoilage microbes and dangerous pathogens. This is achieved through a concept known as “hurdle technology,” where you create a series of environmental barriers that harmful organisms cannot overcome. These hurdles are salt, acidity (low pH), and an oxygen-free (anaerobic) environment.
This guide moves beyond generic advice to give you a microbiologist’s view of the process. We will dissect each critical safety hurdle, empowering you to troubleshoot with confidence. We’ll explore the science behind salt ratios, how to perform a sensory audit to spot danger, and why your choice of vessel matters. We will then broaden our lens to see how these principles of managing living systems apply to other areas of home science, from probiotics to plant care.
This article provides a detailed roadmap to mastering fermentation and other related home sciences. Explore the sections below to understand each critical component, from foundational safety principles to advanced techniques.
Summary: Lacto-Fermentation Science and Beyond
- Why Is The 2% Salt Ratio Critical For Preventing Botulism?
- How To Identify Kahm Yeast Vs Dangerous Mold In Your Ferment
- Water Seal Crocks Vs Jars: Is Traditional Gear Worth The Investment?
- The Temperature Trap: Why Fermenting In Summer Speeds Up Spoilage
- When To Refrigerate: Tasting Your Kimchi To Find The Perfect Sourness
- How To Choose A Probiotic Strain Specifically For Stress Reduction?
- The Love Trap: Why Over-Watering Kills More Plants Than Drought
- Plant-Based Meat Substitutes: How To Cook Tofu So It Actually Tastes Good?
Why Is The 2% Salt Ratio Critical For Preventing Botulism?
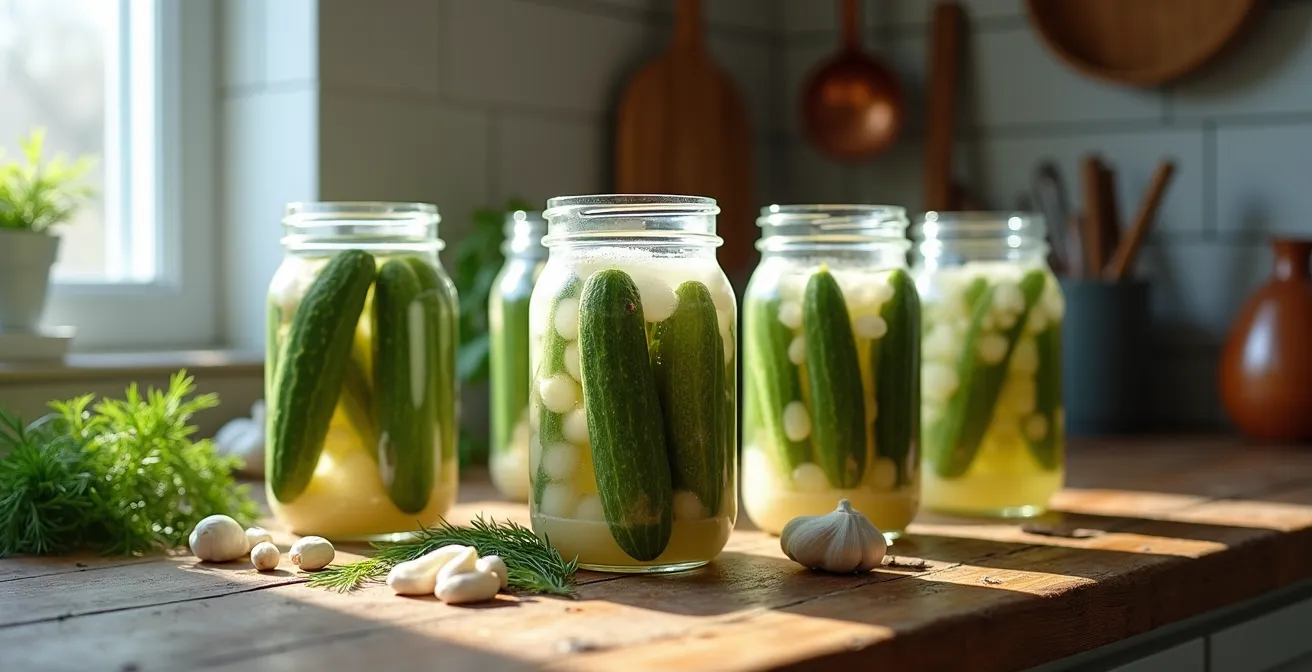
The single most important rule in safe lacto-fermentation is the salt concentration. A minimum of 2% salt by total weight (vegetables + water) is the foundational hurdle that separates a healthy ferment from a potential hazard. This isn’t an arbitrary number; it’s a precise calculation designed to inhibit a wide range of spoilage microbes while creating the perfect environment for beneficial Lactobacillus bacteria to thrive. Most importantly, it’s a primary defense against the growth of Clostridium botulinum, the bacterium responsible for botulism.
Salt’s protective power works through osmotic pressure. By creating a brine that is saltier than the fluid inside the vegetable cells, it draws water out of the produce, creating the liquid brine essential for fermentation. Simultaneously, this high-salt environment puts immense osmotic stress on unwanted bacteria, dehydrating and killing them or preventing their proliferation. Lactobacillus species are uniquely salt-tolerant (halotolerant), giving them a crucial head start in the microbial competition. This allows them to begin consuming sugars and producing lactic acid, which is the next critical safety hurdle.

While salt is the first line of defense, it works in tandem with acidity. The ultimate goal is to create an environment so acidic that C. botulinum cannot produce its deadly toxin. According to food safety guidelines, this bacterium cannot grow in environments with a pH of 4.6 or lower. The initial 2% salt concentration ensures that only the acid-producing Lactobacillus can take hold, guaranteeing the brine will quickly become acidic enough to be safe. Skimping on salt removes this primary guardrail, opening the door for harmful microbes to multiply before the pH has a chance to drop.
How To Identify Kahm Yeast Vs Dangerous Mold In Your Ferment
One of the most nerve-wracking moments for any home fermenter is discovering a film or growth on the surface of their brine. The immediate fear is mold, which can produce harmful mycotoxins and means the entire batch must be discarded. However, not all surface growth is a sign of failure. It’s crucial to learn the difference between dangerous mold and harmless Kahm yeast. Kahm yeast is a common term for a variety of wild, film-forming yeasts that can appear on ferments. While it can sometimes impart a minor off-flavor, it is generally considered harmless and can be skimmed off the surface.
The visual distinction is key. Mold is fuzzy, hairy, and often appears in distinct circular spots. It can be black, green, blue, pink, or white. If you see anything that looks like the mold on old bread or cheese, it is unequivocally a sign of contamination. This happens when the ferment is exposed to oxygen, allowing airborne mold spores to land and colonize the surface. In contrast, Kahm yeast is typically a flat, white, and often wrinkled or geometric-looking film that covers the entire surface of the brine. It is not fuzzy or hairy. It’s simply an opportunistic aerobic yeast that took advantage of a small amount of oxygen at the surface.
Case Study: Differentiating Normal and Abnormal Fermentation Signs
A common source of anxiety for beginners is the appearance of the brine itself. An analysis of typical fermentation processes reveals that cloudy brine is a completely normal and healthy sign, indicating robust bacterial activity. Likewise, a white sediment at the bottom of the jar is simply expired yeast cells and is not a cause for concern. Some ingredients can also cause alarming but harmless changes; for example, garlic often turns a bright blue or green due to enzymatic reactions in the acidic environment. The key takeaway from these observations is to trust clear indicators of spoilage—like fuzzy, colored mold or a putrid smell—over benign cosmetic changes like cloudy brine or discolored garlic.
Because visual cues can sometimes be subtle, a systematic sensory check is the best practice before ever tasting a ferment. Trust your senses—they have evolved to detect spoilage effectively.
Your 5-Step Sensory Safety Audit
- SMELL: First, smell the ferment. It should have a pleasantly sour, acidic, or tangy aroma. If it smells putrid, rotten, like garbage, or just deeply unpleasant, do not proceed. DISCARD IT.
- LOOK: Examine the surface and the vegetables. Is there any fuzzy, hairy, or colored growth (black, green, pink, blue)? If yes, it’s mold. DISCARD IT. If you see a flat, white, wrinkly film, it’s likely Kahm yeast and safe to skim off.
- TEXTURE: Gently poke a vegetable. It should be firm, and crunchy or “al dente.” If the vegetables are slimy, mushy, or seem to be dissolving, this indicates spoilage from unwanted enzymatic activity. DISCARD IT.
- BRINE CHECK: Observe the liquid. Cloudy brine is normal. However, if the brine has become thick, viscous, or slimy like egg whites, this is a sign of contamination by undesirable microbes. DISCARD IT.
- FINAL TASTE: Only if the ferment has passed all four previous checks, taste a very small amount. It should taste pleasantly sour and salty. If it tastes “off” in any way, trust your instincts. When in doubt, throw it out.
Water Seal Crocks Vs Jars: Is Traditional Gear Worth The Investment?
The battle against mold and Kahm yeast is fundamentally a battle against oxygen. These organisms are aerobic, meaning they require oxygen to survive and thrive. Therefore, the single most effective way to prevent them is to create a truly anaerobic environment for your ferment. This is where your choice of fermentation vessel becomes a critical safety decision. While a basic mason jar can work, it requires constant vigilance. Investing in specialized gear like a water-sealed crock or an airlock system for jars dramatically increases your success rate by automating oxygen control.
A water-sealed fermentation crock is the traditional gold standard for a reason. This type of ceramic vessel features a moat or channel around the rim. The lid sits inside this moat, which you fill with water. As the fermentation produces carbon dioxide (CO2), the gas pressure builds and bubbles out through the water, but the water barrier makes it impossible for oxygen or airborne spores to get in. This creates a nearly perfect anaerobic environment, making mold growth almost impossible. Additionally, as noted by the experts at Humble House Fermentation, the opaque ceramic walls offer complete protection from light, which can degrade nutrients and affect the ferment’s quality.
A more modern and affordable alternative is a mason jar fitted with an airlock. Similar to the devices used in beer and winemaking, an airlock is a small plastic S-bend or 3-piece device that fits into a modified lid. It holds a small amount of water, allowing CO2 to escape while blocking oxygen from entering. This system is highly effective at preventing mold and eliminates the need for daily “burping” (opening the jar to release pressure), which is the main point of failure for basic jar fermentation as it repeatedly introduces oxygen.
The following table breaks down the key differences in safety and maintenance between the most common fermentation vessels, based on a direct comparison of their features.
| Feature | Water-Sealed Crock | Mason Jar with Airlock | Basic Mason Jar |
|---|---|---|---|
| Anaerobic Environment | Excellent – water seal prevents all oxygen | Good – airlock allows CO2 out, no O2 in | Poor – requires daily burping |
| Mold Prevention | Superior – near impossible for mold growth | Good – significantly reduced risk | Moderate – higher risk at surface |
| Light Protection | Complete – opaque ceramic walls | None – requires dark storage | None – requires dark storage |
| Investment Cost | $50-200 | $15-30 per jar setup | $5-10 per jar |
| Maintenance | Refill water seal weekly | Monitor airlock water level | Daily burping required |
The Temperature Trap: Why Fermenting In Summer Speeds Up Spoilage
After managing salt and oxygen, temperature is the third critical variable you must control. Temperature directly dictates the speed of fermentation and, more importantly, the texture and safety of the final product. Many beginners fall into the “temperature trap,” assuming that warmer is always better because it speeds things up. While heat does accelerate microbial activity, it creates a chaotic environment that often leads to spoilage, mushy pickles, and off-flavors. Fermentation is a marathon, not a sprint.
The ideal temperature range creates a controlled race where desirable Lactobacillus bacteria can dominate. According to the University of Minnesota Extension, fermenting at 70-75°F (21-24°C) is the sweet spot. In this range, Lactobacillus species work efficiently, producing lactic acid at a steady pace that acidifies the brine before spoilage organisms can take hold. This range typically results in a fully fermented, safe product in about 3 to 4 weeks.
Exceeding this range, especially in the heat of summer, is a recipe for disaster. When temperatures climb above 80°F (27°C), the fermentation process becomes frantic. Not only does Lactobacillus work too quickly, but other, less desirable microbes and enzymes also become hyperactive. This includes pectinase, an enzyme that breaks down pectin—the cellular glue that keeps pickles crunchy. This enzymatic activity is the primary cause of the dreaded mushy pickle. Furthermore, high temperatures can favor the growth of yeasts and other microbes that produce unpleasant, “yeasty” or “funky” flavors and aromas, ruining the batch.
Case Study: The Impact of Temperature on Fermentation Speed and Quality
A study by NC State Extension confirmed the critical role of temperature. They found that while a ferment at 70-75°F was complete in 3-4 weeks, lowering the temperature to 55-65°F (13-18°C) extended the process to 5-6 weeks but yielded pickles with far superior flavor and texture. Conversely, ferments held above 80°F became unacceptably soft and developed off-flavors. The conclusion was clear: cooler, slower fermentation produces the highest quality product with optimal crunch and taste, while high heat significantly increases the risk of spoilage.
When To Refrigerate: Tasting Your Kimchi To Find The Perfect Sourness
The final stage of a successful ferment is knowing when to stop it. Fermentation is a dynamic process; left at room temperature, the Lactobacillus bacteria will continue to convert sugars into lactic acid until their food source is depleted. This leads to an increasingly sour product that may eventually become too acidic for your taste. Refrigeration is the brake pedal. By moving your ferment to the cold environment of the refrigerator (below 40°F/4°C), you dramatically slow down the microbial activity, effectively pausing the fermentation and preserving the flavor and texture at its peak.
So, when is the right time? The answer involves both science and personal taste. From a safety perspective, the primary goal is to ensure the brine has reached a sufficiently low pH. As the World Health Organization confirms, fermentation is a highly effective preservation method precisely because of this acidification. According to the WHO, as cited by fermentation experts, the process is considered safe once the environment is hostile to pathogens.
According to the WHO, fermented foods should have a pH of less than 4.6, below which pathogenic bacteria cannot grow.
– World Health Organization, Is Lacto-Fermentation Safe? – Revolution Fermentation
Using pH test strips or a digital meter is the most accurate way to verify safety. You should see the pH drop steadily over the first week. Once it is safely below pH 4.6, the ferment is biologically stable. From this point on, the decision to refrigerate is based on flavor. You can start tasting your ferment (e.g., your kimchi or pickles) daily. Are they sour enough for you? Do they still have a good crunch? When you hit that perfect balance of sour, salty, and crunchy, it’s time to move the entire batch to the fridge. This will lock in that flavor profile for months to come.
For those seeking precision, following a pH testing protocol provides a clear timeline. Generally, a safe pH is reached within 5-7 days at optimal temperatures, but continuing the ferment to a pH of around 4.0-4.4 can enhance flavor complexity and storage life. The key is to test, taste, and then refrigerate when your palate and the pH meter agree it’s ready.
How To Choose A Probiotic Strain Specifically For Stress Reduction?
Just as we select for specific strains of Lactobacillus in fermentation to produce a desired outcome (lactic acid), the world of supplemental probiotics is moving towards strain-specific benefits for human health. The general idea of “taking a probiotic” is evolving into a more nuanced approach of choosing specific microbial allies for targeted goals, such as managing stress. These specialized probiotics are known as psychobiotics. They are defined as live organisms that, when ingested in adequate amounts, produce a health benefit in patients suffering from psychiatric illness.
The mechanism behind their effectiveness lies in the gut-brain axis, a complex communication network connecting the gastrointestinal tract and the central nervous system. Certain probiotic strains can influence this axis by producing neurotransmitters like serotonin and GABA, reducing inflammation, and modulating the body’s stress response (the HPA axis). When selecting a strain for stress reduction, it’s essential to look for clinical research backing specific strains.
Two of the most well-researched strains in this area are Lactobacillus helveticus R0052 and Bifidobacterium longum R0175. Studies have shown this specific combination can help lower cortisol levels (the primary stress hormone) and reduce psychological distress, including anxiety and depression. Another promising strain is Lactobacillus plantarum PS128, which has been studied for its ability to modulate dopamine and serotonin, potentially improving mood and reducing stress-related behaviors. When purchasing a probiotic for stress, ignore generic “probiotic blend” labels and look for products that list these specific, clinically-validated strain names and corresponding CFU (colony-forming unit) counts used in the studies.
The Love Trap: Why Over-Watering Kills More Plants Than Drought
The principle of creating a balanced, life-sustaining environment is not limited to microbes; it’s the foundation of all home biology, including plant care. For many new plant owners, the most common mistake is a form of “killing with kindness”: over-watering. The impulse to constantly provide water is understandable, but it creates an environment that is just as deadly to a plant’s roots as a desert is to its leaves. Understanding the “why” behind this comes down to one crucial element: oxygen.
Plant roots are not just straws for drinking water; they are living organs that need to breathe. They perform respiration, a process that requires oxygen from the surrounding soil. When soil is appropriately moist, there are tiny air pockets between soil particles that hold the oxygen roots need. When you over-water, you completely saturate these pockets, replacing all the air with water. This creates an anaerobic (oxygen-free) soil environment. Just like mold can’t grow in an anaerobic ferment, roots cannot survive in anaerobic soil.
Deprived of oxygen, the roots effectively begin to drown. They can no longer perform their essential functions of absorbing water and nutrients, and they start to die and decay. This condition is known as root rot. It creates a secondary problem: the dead and dying root tissue becomes a food source for pathogenic fungi and bacteria that thrive in wet, low-oxygen conditions. These pathogens then attack the remaining healthy roots, accelerating the plant’s decline. The tragic irony is that the visible symptoms of an over-watered plant—wilting, yellowing leaves—often look like symptoms of thirst, prompting the owner to water it even more, which is the final nail in the coffin.
Key Takeaways
- Embrace the 2% Rule: Always use at least 2% salt by total weight as your non-negotiable first safety hurdle to inhibit bad bacteria.
- Master Visual I.D.: Learn to distinguish flat, harmless Kahm yeast from fuzzy, colored, and dangerous mold. When in doubt, throw it out.
- Control Oxygen and Temperature: Use a water-sealed crock or airlock to create an anaerobic environment, and ferment in a cool spot (70-75°F / 21-24°C) to prevent spoilage and mushy texture.
Plant-Based Meat Substitutes: How To Cook Tofu So It Actually Tastes Good?
Mastering home science extends to food chemistry and understanding how to transform ingredients. Tofu, a staple of plant-based diets, is often maligned for being bland or spongy. The secret to delicious tofu lies not in a complicated marinade, but in fundamentally altering its physical structure to allow it to absorb flavor and develop a satisfying texture. The key to this transformation is the aggressive removal of water.
Tofu is packed in water, and this internal water content acts as a barrier. Like a full sponge, it cannot absorb any more liquid, meaning marinades just coat the surface. The first and most critical step is to press your tofu. For firm or extra-firm tofu, this means wrapping the block in paper towels or a clean kitchen towel and placing a heavy weight on top (like a cast-iron skillet or a stack of books) for at least 30 minutes, or up to an hour. A dedicated tofu press automates this process. This step can remove up to half a cup of water, creating countless empty voids within the tofu’s protein structure, ready to absorb flavor.
For an even more dramatic textural change, combine pressing with freezing. After pressing, cut the tofu into your desired shape (cubes, slabs), place it in a single layer in a container, and freeze it solid. When you thaw it, the water crystals that formed will have created even larger, more porous channels. The thawed tofu will have a chewier, more “meaty” texture. After thawing, give it one final, gentle press to expel the last of the released water. This twice-pressed, post-freeze tofu is now a flavor super-sponge. It will readily soak up marinades and develop a firm, browned crust when pan-fried, baked, or air-fried, completely avoiding the dreaded sogginess.
By applying these principles of microbial, botanical, and chemical control, you move from simply following recipes to truly understanding the science in your kitchen. To start your journey, the next logical step is to gather the right tools and ingredients for your first controlled fermentation.