In summary:
- Successful molecular gastronomy is not about recipes, but about precise control over chemical and physical parameters.
- Mastering spherification requires a digital scale with 0.1g accuracy; volumetric spoons are a primary cause of failure.
- The choice of gelling agent (e.g., Agar Agar vs. Gelatin) is a critical decision in textural engineering that dictates stability and mouthfeel.
- Timing is a crucial ingredient; basic spherification pearls must be served immediately as the gelling process is continuous and irreversible.
- This scientific mindset of system control can be applied to plating aesthetics, and even traditional food preservation techniques.
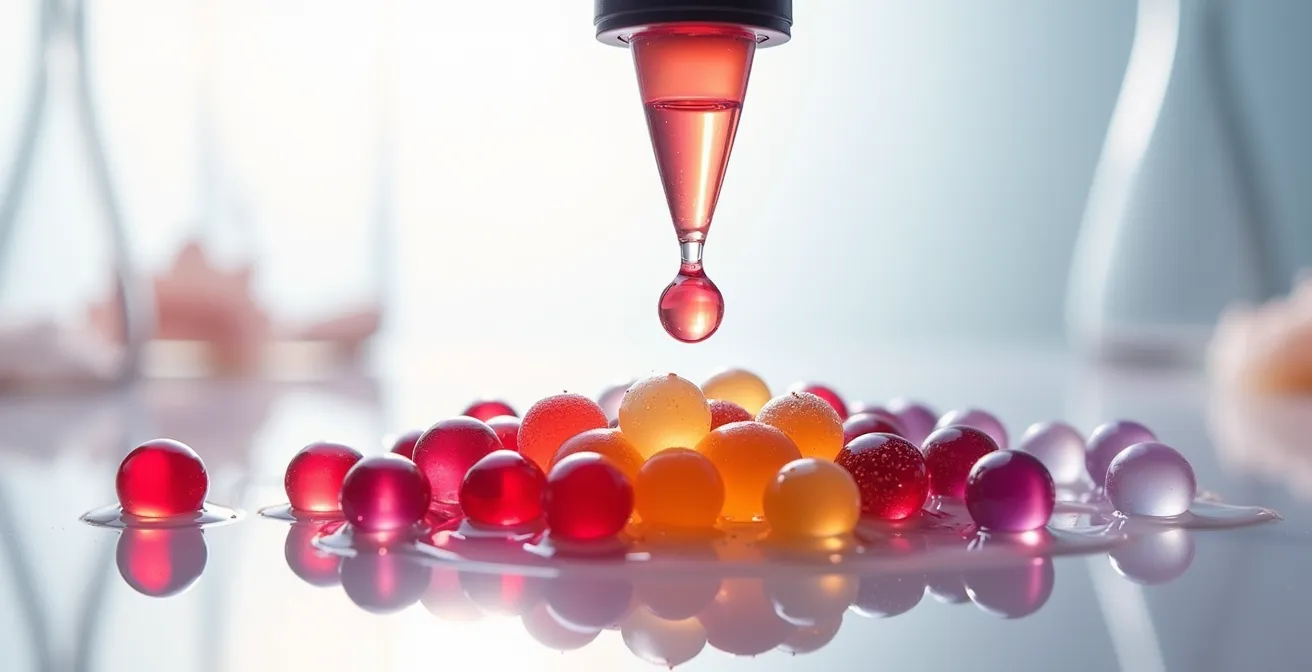
The allure of molecular gastronomy is the power to transform the familiar into the magical. Turning a simple fruit juice into a cascade of shimmering, jewel-like pearls—fruit caviar—seems like a feat reserved for avant-garde restaurant kitchens. Many home cooks, armed with a starter kit and boundless enthusiasm, attempt this technique only to be met with frustrating failure: messy blobs, weak skins, or a slurry of semi-gelled liquid. The common advice is to “follow the recipe closely,” but this overlooks the fundamental truth of the craft.
The failures don’t stem from a faulty recipe, but from a misunderstanding of the process. Molecular gastronomy is not cooking in the traditional sense; it is a discipline of applied science. It demands a shift in mindset from approximation to absolute precision, from following steps to controlling a chemical system. The difference between success and failure is not measured in teaspoons, but in tenths of a gram. It’s about understanding the properties of your materials and the non-negotiable variable of time.
This guide will not just give you a recipe. It will instill the scientific mindset required to master spherification. We will deconstruct the process, revealing why precision is paramount, how to select the correct materials for textural engineering, and how to manage the critical factor of time. By embracing this philosophy of system control, you will not only create perfect fruit caviar but also unlock a new way of thinking about food, from its chemical structure to its final, artistic presentation on the plate.
For those who prefer a visual format, the following video provides a concise explanation of the core spherification process, complementing the detailed scientific principles we will explore in this guide.
To truly master this technique, we will dissect each critical component of the process. This article breaks down the core scientific principles, from the necessity of precision measurement to the art of plating and the surprising connections between different culinary disciplines. Explore the sections below to build your expertise systematically.
Summary: A Chef’s Guide to Spherification
- Scales vs Spoons: Why Molecular Cooking Fails Without 0.1g Accuracy?
- Agar Agar vs Gelatin: Which Texture Is Right for Vegan Mousses?
- Safety First: How to Make Instant Ice Cream Without Frostbite?
- The “Negative Space” Rule: Why Fancy Food Looks Better on Large Plates?
- When to Plate: Why Spherified Liquids Melt If Left Too Long?
- How to Layer Synth Basses to Create a Wall of Sound?
- 2% vs 5% Brine: How Much Salt Stops Bad Bacteria?
- Lacto-Fermentation 101: How to Pickle Vegetables Without Botulism Risk?
Scales vs Spoons: Why Molecular Cooking Fails Without 0.1g Accuracy?
The single greatest point of failure for aspiring home chefs in molecular gastronomy is the reliance on traditional measurement tools. A “teaspoon” or “tablespoon” is a unit of volume, subject to variations in packing density and user interpretation. Spherification, however, is not a culinary art in this regard; it is a chemical reaction. The process depends on precise ratios of sodium alginate to your base liquid and calcium chloride to water. An imbalance of even a fraction of a gram can lead to a complete failure of the gel membrane to form, or the creation of an unpleasantly tough or rubbery texture.
The core principle here is parameter precision. To achieve the iconic liquid-filled spheres, you must control the variables. For example, direct spherification typically requires a sodium alginate concentration of 0.5% relative to the weight of your flavored liquid. If you have 1000g of juice, you need exactly 5g of sodium alginate. A slight deviation renders the entire batch useless. This level of accuracy is impossible to achieve with volumetric spoons.
Therefore, a digital scale with at least 0.1g precision is a non-negotiable tool, not an accessory. It is the foundation of moving from guesswork to predictable, repeatable results. Treating your kitchen like a laboratory, where every component is weighed with scientific rigor, is the first and most critical step toward mastering this technique. Without this fundamental shift in practice, you are not controlling the system; you are gambling with it.
Agar Agar vs Gelatin: Which Texture Is Right for Vegan Mousses?
Once precision is established, the next critical decision involves material science: the choice of gelling agent. While spherification relies on the specific reaction between sodium alginate and calcium, other molecular techniques like creating gels, foams, and mousses require different hydrocolloids. The two most common are gelatin and agar agar, and their properties are vastly different. Understanding them is key to successful textural engineering. Gelatin, an animal-derived protein, creates a soft, elastic gel that melts near body temperature, delivering a signature “melt-in-your-mouth” sensation. This makes it ideal for classic panna cotta or delicate mousses.
Agar agar, a seaweed derivative, behaves entirely differently. It is not only vegan-friendly but also sets at room temperature and has a much higher melting point of around 85°C (185°F). This thermal stability makes it perfect for preparations that need to hold their shape in warmer conditions. However, the texture it produces is distinct: it is firmer, more brittle, and creates a clean “snap” rather than an elastic stretch. As an example, a test using 1g of agar agar in orange juice successfully created firm caviar pearls that held their shape perfectly when dropped into cold oil, a feat difficult with less stable gelling agents.
Choosing between them is not about which is “better,” but which is correct for the desired outcome. For a vegan mousse intended to be served cold but remain stable on a plate, agar agar is the superior choice. For a classic, jiggly dessert that dissolves luxuriously on the tongue, gelatin is irreplaceable. The following table breaks down these key differences.
This comparative analysis, based on a deep dive into hydrocolloid properties, is fundamental for any chef looking to control texture with intent.
| Property | Agar Agar | Gelatin |
|---|---|---|
| Setting Temperature | Room temperature | Refrigeration required |
| Melting Point | 85°C (185°F) | 27°C (80°F) – body temperature |
| Texture | Brittle snap, clean break | Elastic, melts in mouth |
| Vegan-Friendly | Yes (seaweed-based) | No (animal-based) |
| Gel Strength | Firmer at same concentration | Softer, more elastic |
Safety First: How to Make Instant Ice Cream Without Frostbite?
Techniques like making “instant” ice cream with liquid nitrogen or handling concentrated chemical solutions elevate the need for a scientific mindset to include rigorous safety protocols. The “wow” factor of billowing smoke or instant freezing must be balanced with an unwavering commitment to safety. Liquid nitrogen, while inert, is extremely cold (-196°C or -321°F) and can cause severe frostbite upon contact. Similarly, the chemicals used in spherification, like calcium chloride, are safe in their food-grade forms and diluted solutions, but can be irritants in concentrated forms.
Adopting a “lab safety” approach is not optional. This means always using food-grade ingredients and never substituting with industrial or non-food-grade chemicals, such as calcium chloride intended for de-icing sidewalks. It involves wearing protective gear like gloves and safety glasses when handling stock solutions, ensuring proper ventilation when working with substances like liquid nitrogen, and maintaining a clean, organized workspace to prevent cross-contamination or spills. Rinsing spherified pearls thoroughly is also a critical step to remove any excess calcium chloride solution, ensuring a pleasant taste and texture.
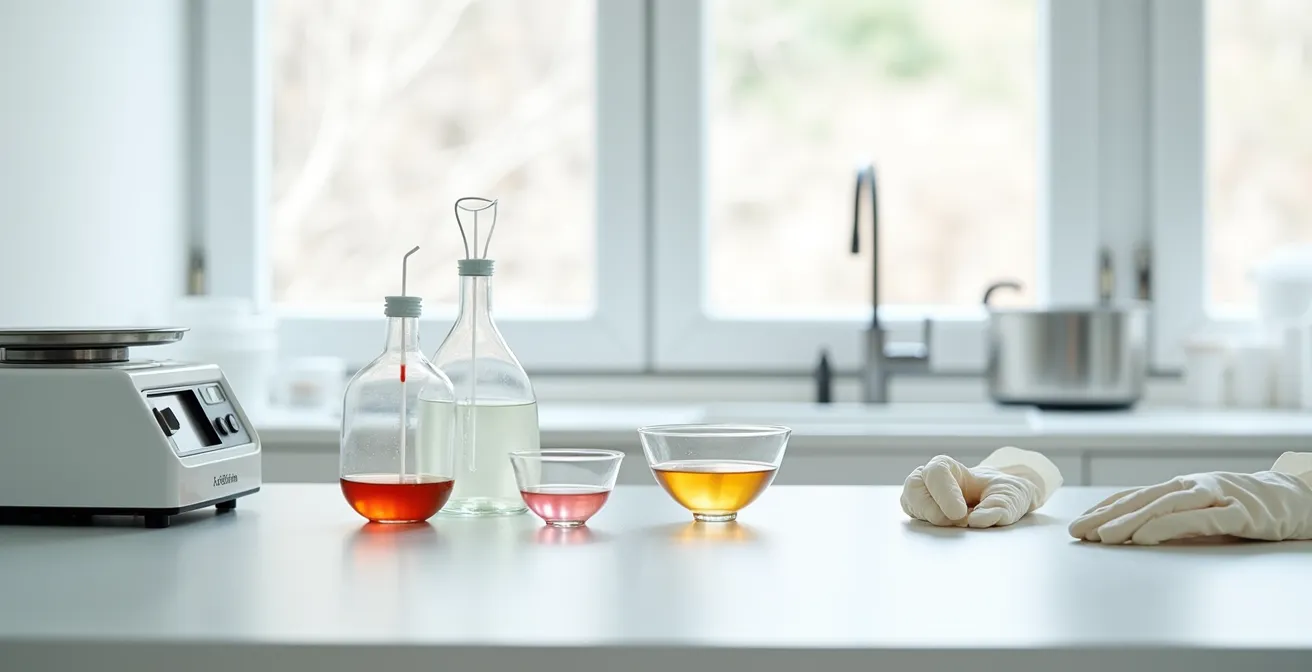
The image above illustrates an ideal setup: clean, organized, and with all necessary equipment at hand. This level of professionalism minimizes risk and ensures that the focus remains on creativity, not on managing a hazardous situation. Following a strict safety checklist is the hallmark of a true professional, whether in a three-star kitchen or a home lab.
Checklist for a Safe Home Laboratory: Key Protocols to Verify
- Ingredient Sourcing: Confirm that all chemicals, especially sodium alginate and calcium chloride, are explicitly labeled “food-grade.” Cross-reference sources with trusted scientific supply vendors.
- Protective Equipment: Inventory your safety gear. Do you have protective gloves and safety glasses ready before handling any concentrated solutions or extreme temperatures?
- Chemical Storage & Labeling: Check that all chemical containers are clearly labeled with their contents and stored in a dry, secure location away from other foodstuffs.
- Rinsing Procedure: Define your rinsing step. Are all spheres thoroughly but gently rinsed in a clean water bath to remove any residual setting solution before serving?
- Workspace Preparation: Before starting, is your work surface clear, clean, and organized to prevent spills and cross-contamination?
The “Negative Space” Rule: Why Fancy Food Looks Better on Large Plates?
A scattering of 20 tiny, jewel-like spheres feels more luxurious and complex than a single, larger dollop of sauce of the same flavor.
– Molecular Gastronomy Expert, Molecular Recipes – Tips for Spherification Caviar
The principles of system control in molecular gastronomy extend beyond chemistry into the realm of aesthetics and perception. The way a dish is plated is a form of sensory architecture, designed to guide the diner’s experience. One of the most powerful tools in this discipline is the use of negative space. A large plate provides a canvas, and the food elements are the art. By intentionally leaving parts of the canvas empty, you create contrast, draw focus, and elevate the perceived value of what is present.
Fruit caviar is a perfect example of this principle in action. A dense pile of pearls on a small dish can look messy and unrefined. However, a careful arrangement of those same pearls—perhaps in a gentle arc or a deliberate cluster—on a large white plate transforms them into a sophisticated garnish. The negative space around them gives them room to “breathe,” highlighting their unique shape and translucent beauty. This technique creates a sense of elegance and intention.
Professional chefs leverage this to build visual narratives on the plate. In one notable example, translucent passion fruit pearls were arranged in a curved line leading the eye from a dollop of coconut mousse to the main element, a piece of seared fish. The empty space was not “wasted”; it was an active component of the design, creating movement and anticipation. This demonstrates that plating is not merely decoration; it’s a structural element of the dish, as crucial as the flavor balance itself.
When to Plate: Why Spherified Liquids Melt If Left Too Long?
In molecular gastronomy, time is not just a suggestion on a recipe card; it is an active, and often unforgiving, ingredient. This is especially true for “basic” or “direct” spherification, the most common method for making fruit caviar. The process involves dropping a sodium alginate-infused liquid into a calcium chloride bath. A gel membrane instantly forms where the two solutions meet. However, the reaction does not stop there. The calcium ions continue to migrate inward, causing the gel wall to thicken over time.
This is why timing is a critical parameter to control. For spheres intended to have a liquid center, the “cooking” time in the calcium bath must be incredibly brief, often less than a minute. Once removed and rinsed, they must be served almost immediately. If left to sit, even for 20-30 minutes, the gelling process continues until the entire sphere becomes a solid, firm ball of gel, losing its signature “pop” and liquid burst. The magic is lost.
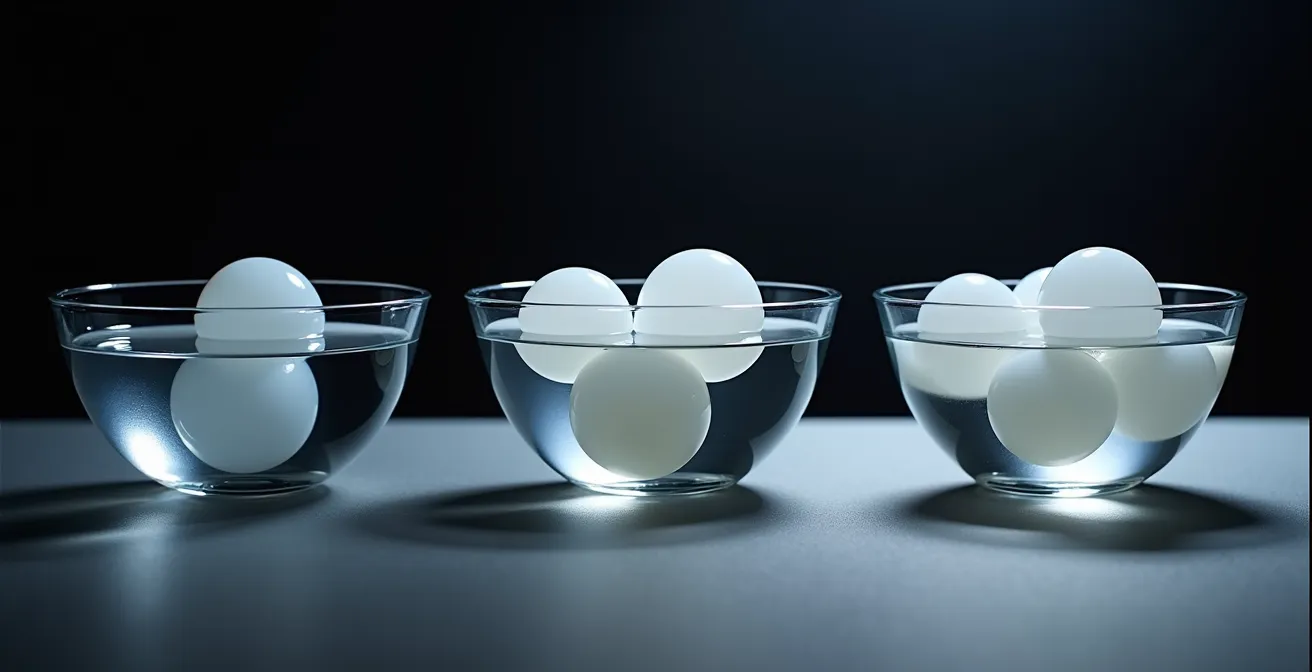
The visual progression above illustrates this concept perfectly: from a delicate liquid-centered pearl on the left to a fully solidified gel on the right. This continuous reaction is a feature of direct spherification. An alternative, “reverse spherification,” where a calcium-rich liquid is dropped into an alginate bath, creates spheres with a stable gel membrane that does not continue to thicken. These spheres can be made in advance and stored, offering more flexibility. However, for the home cook starting with a basic kit, understanding the irreversible nature of the direct spherification timeline is essential for success. The final plating must be timed to the moment of creation.
How to Layer Synth Basses to Create a Wall of Sound?
At first glance, the art of sound design seems worlds away from the culinary laboratory. Yet, the underlying principle of building a complex, satisfying experience from individual components is identical. The “System Control” mindset applies just as much to layering audio frequencies as it does to layering food textures. In music production, creating a “wall of sound” with synth basses isn’t about using one massive, overpowering sound. It’s about a form of sonic architecture, where different layers occupy distinct frequency bands to create a whole that is richer than the sum of its parts.
Too many competing ‘wow’ textures (a foam, a gel, a powder, and a sphere) will cancel each other out.
– Molecular Gastronomy Instructor, Advanced Spherification Techniques
This culinary advice applies perfectly to audio. Too many “wow” sounds competing in the same frequency range result in a muddy, incoherent mix. A successful bass sound might be composed of three layers: a deep, foundational “sub-bass” providing low-end weight, a textured “mid-range” layer that gives the sound its character and makes it audible on smaller speakers, and a “high-frequency sizzle” or noise layer that adds bite and helps it cut through the mix. Each layer has a specific job and a specific space.
This is analogous to plating. A dish can be architected with similar “frequency” principles, where each texture and flavor has a role:
- Sub-bass: The foundational element, like a solid protein or a rich, creamy purée.
- Mid-range: The core flavors and supporting textures that define the dish’s character.
- High-frequency sizzle: The bright, sharp accents that cut through and provide excitement, such as the pop of fruit caviar, a sprinkle of acid, or a crunchy element.
By limiting the number of “lead” textures and ensuring each element has its own space in the overall sensory composition, you avoid confusion and create a coherent, impactful experience—whether on a plate or through a speaker.
Key takeaways
- Precision is paramount: A 0.1g scale is not a tool but the foundation of successful molecular gastronomy, where chemistry dictates results.
- Material science dictates texture: The choice between gelling agents like agar agar and gelatin is a deliberate act of textural engineering.
- Time is an irreversible ingredient: In direct spherification, the gelling process is continuous, making immediate service a critical component of the technique.
2% vs 5% Brine: How Much Salt Stops Bad Bacteria?
Shifting from the “engineered” world of molecular gastronomy to the “shepherded” world of fermentation, the principle of parameter precision remains just as crucial, though the mechanism is different. In spherification, you build a structure from inert chemicals. In fermentation, you create the ideal environment to guide the activity of beneficial living organisms while suppressing harmful ones. The primary parameter you control is salinity.
The concentration of salt in a brine has a profound and multifaceted effect on the process. It’s not just for flavor; it’s a powerful tool for microbial selection and textural preservation. Through osmosis, salt draws water out of the vegetable cells, resulting in a crispier texture. More importantly, it creates an environment where salt-tolerant beneficial bacteria (like Lactobacillus) can thrive, while inhibiting the growth of undesirable spoilage microbes and pathogens.
The specific percentage of the brine is a deliberate choice based on the desired outcome. A light 2% brine might be used for a quick, short-term pickle, providing basic pathogen inhibition. A traditional lacto-fermentation often uses a 3.5% brine. A stronger 5% brine exerts more intense selective pressure, creating an environment highly favorable to the “good” bacteria and resulting in maximum crispness, making it ideal for long-term preservation.
The table below outlines how this single variable—salt concentration—systematically alters the final product. It is a clear demonstration of controlling a biological system through a precise initial input.
| Concentration | Effect on Texture | Microbial Control | Application |
|---|---|---|---|
| 2% Brine | Minimal water extraction | Basic pathogen inhibition | Light pickling, short-term storage |
| 3.5% Brine | Moderate firmness | Standard fermentation environment | Traditional lacto-fermentation |
| 5% Brine | Maximum crispness via osmosis | Strong selective pressure for beneficial bacteria | Long-term preservation, crispy pickles |
Lacto-Fermentation 101: How to Pickle Vegetables Without Botulism Risk?
The ultimate goal of controlling parameters in fermentation is food safety. The primary risk in any anaerobic (oxygen-free) environment, such as pickling, is the growth of Clostridium botulinum, the bacterium responsible for botulism. Fortunately, this dangerous pathogen cannot survive in an acidic environment. The entire purpose of lacto-fermentation is to cultivate beneficial Lactobacillus bacteria, which consume sugars in the vegetables and produce lactic acid as a byproduct. This acid is what preserves the food and makes it safe.
Spherification is ‘Engineering’, where you build a new structure with precise chemical inputs. Fermentation is ‘Shepherding’, where you create the perfect environment to guide beneficial living organisms.
– Food Science Researcher, Molecular Gastronomy vs Traditional Fermentation
This distinction between engineered versus shepherded systems is profound. In fermentation, your job is to create an environment where the “good” organisms win. The two key parameters you control to ensure this are salinity (as discussed previously) and pH. Food science research confirms that for fermentation to be considered safe, the pH of the brine must drop below a threshold of 4.6. This level of acidity is sufficient to inhibit the growth of C. botulinum and other pathogens. This is why the process takes time; you are waiting for the bacteria to produce enough acid to render the environment safe.
Interestingly, pH is also a critical parameter in spherification, but for a different reason. The gelling of sodium alginate fails in highly acidic conditions. For successful spherification, the pH of your base liquid must generally be above 3.6. This reveals a universal truth across these culinary disciplines: whether you are building an inert gel structure or guiding a living ecosystem, success and safety are entirely dependent on understanding and precisely controlling key environmental parameters like pH and chemical concentrations.
By embracing this scientific mindset, you move beyond simply following recipes and begin to truly understand the ‘why’ behind the ‘how’. This empowers you to innovate, troubleshoot, and create with confidence, transforming your kitchen into a true laboratory of flavor and texture.