
The fear of botulism in home fermentation is valid, but it is 100% preventable by mastering the scientific principles of acidity and salinity, not just by following a recipe.
- A salt concentration between 2% and 5% is non-negotiable; it creates an environment where beneficial Lactic Acid Bacteria (LAB) thrive and outcompete pathogens.
- The primary goal of fermentation is to rapidly drop the pH below 4.6. This acidic “firewall” makes it impossible for Clostridium botulinum spores to produce their deadly toxin.
Recommendation: Shift your focus from fear to control. By managing salt, temperature, and monitoring for acidity, you become the master of your ferment’s microbial ecosystem, ensuring both safety and superior flavor.
The allure of lacto-fermentation is powerful. It promises crunchy, probiotic-rich vegetables with complex flavors far beyond what you can buy in a store. Yet, for many health-conscious cooks, this excitement is shadowed by a persistent fear: botulism. You’ve heard the horror stories and the vague advice to “use enough salt” or “keep it clean,” but these instructions often feel like folklore rather than science, leaving you uncertain and hesitant. This anxiety is a significant barrier, preventing many from exploring the immense benefits of fermented foods for gut health.
The common wisdom revolves around recipes, but a recipe can’t adapt to your specific kitchen temperature or the water content of your vegetables. This article will not give you another simple recipe. Instead, it will equip you with something far more powerful: a deep understanding of the core scientific principles that guarantee safety. We will move beyond platitudes and dive into the “why” behind the rules. You’ll learn to think like a fermentation specialist, managing the microbial ecosystem in your jar to ensure beneficial bacteria win every time.
Forget the fear. The key to safe fermentation isn’t a secret ingredient; it’s the strategic control of salt, temperature, and acidity. By mastering these elements, you create an environment where harmful pathogens like Clostridium botulinum simply cannot survive. This guide will walk you through the non-negotiable rules of creating this safe environment, from calculating the perfect brine to identifying what’s growing on the surface of your ferment. You will learn to trust the process because you will understand the science that makes it work.
This article provides a structured path to mastering safe fermentation. We will explore the critical roles of salt concentration and pH, learn to visually distinguish safe surface films from dangerous mold, select the right equipment, control temperature for optimal flavor, and know precisely when your ferment is perfectly and safely done.
Summary: Your Guide to Safe and Flavorful Fermentation
- 2% vs 5% Brine: How Much Salt Stops Bad Bacteria?
- Kahm Yeast vs Mold: Which White Film Is Safe to Eat?
- Glass vs Plastic vs Ceramic: Which Crock Breathes Best?
- Why Your Kimchi Ferments Too Fast in Summer?
- When to Stop Fermentation: The Taste Test vs The pH Strip
- Kefir vs Kombucha: Which Drink Has More Viable Probiotics for Skin Health?
- Agar Agar vs Gelatin: Which Texture Is Right for Vegan Mousses?
- How to Heal Hormonal Acne by Changing Your Breakfast Habits?
2% vs 5% Brine: How Much Salt Stops Bad Bacteria?
Salt is not just for flavor; it’s the primary gatekeeper of your ferment’s safety. Its role is to initiate a process of competitive exclusion. By creating a saline environment, you immediately inhibit the growth of many undesirable putrefying bacteria while giving a competitive advantage to salt-tolerant Lactic Acid Bacteria (LAB). These beneficial microbes are the heroes of fermentation. As they consume sugars in the vegetables, they produce lactic acid, which is the key to long-term safety. The entire process is a race to lower the acidity.
The goal is to create a “pH firewall.” Your ferment must drop below the critical safety threshold of pH 4.6 as quickly as possible. Below this pH, Clostridium botulinum spores cannot activate and produce their toxin. A brine that is too weak (below 1.5%) won’t effectively suppress competing microbes, slowing down acid production and creating a window of risk. Conversely, a brine that is too strong (above 5-6%) can inhibit the beneficial LAB themselves, stalling fermentation altogether.
The ideal range of 2% to 5% salt concentration is the sweet spot. The exact percentage depends on the vegetable’s water content and desired texture, as different LAB species thrive at different salinities. This is not guesswork; it should be calculated based on the total weight of your vegetables and water combined. Using non-iodized salt is crucial, as iodine can inhibit the very bacteria you’re trying to cultivate.
This table illustrates how varying the salt concentration affects the microbial activity and final product, allowing you to tailor your brine to your specific goal.
| Salt Concentration | Vegetable Type | Fermentation Effect | Final Texture |
|---|---|---|---|
| 1.5-2.5% | Cabbage, Soft Vegetables | Fast fermentation, Leuconostoc dominant | Softer, mild tang |
| 2-3% | Firm Vegetables (Carrots, Beets) | Balanced LAB growth | Crisp, moderate sourness |
| 3-5% | Mixed Vegetables | Slower, Lactobacillus dominant | Very crisp, sharp acidity |
| 5% | Cucumbers, Radishes | Very slow, controlled | Maximum crispness |
By precisely controlling the salt, you are not just following a rule; you are actively steering the microbial ecology in your jar towards a safe and delicious outcome.
Kahm Yeast vs Mold: Which White Film Is Safe to Eat?
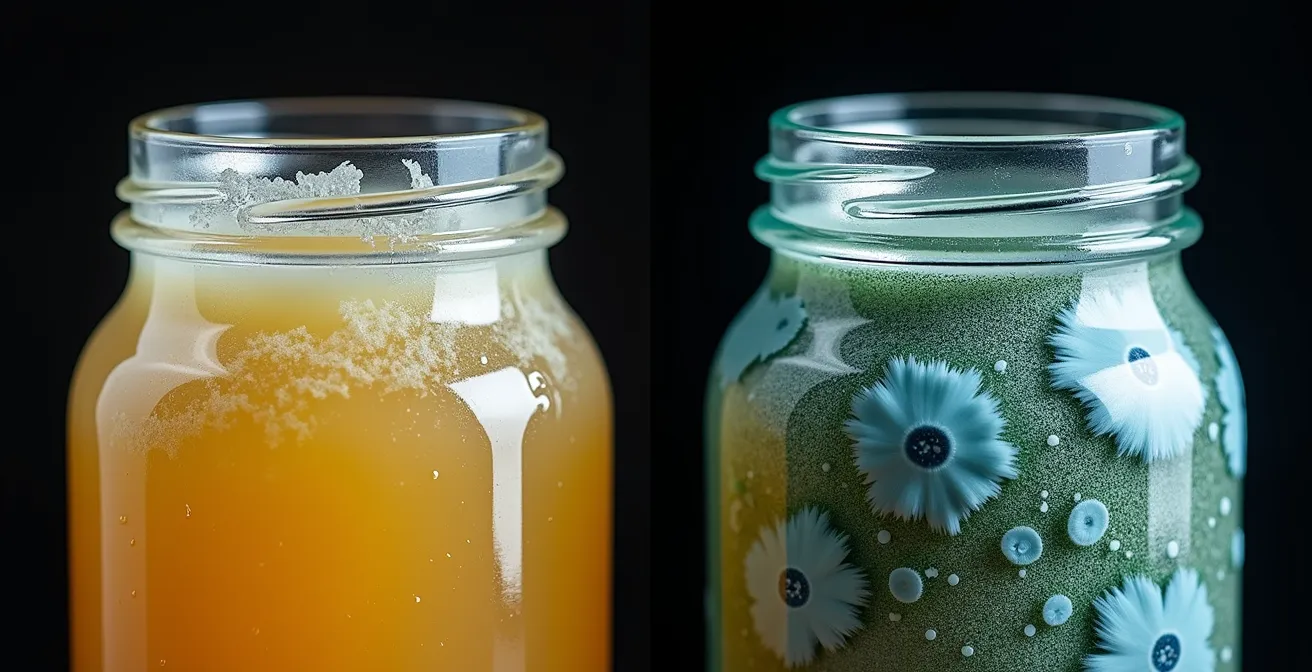
One of the most panic-inducing moments for a new fermenter is discovering a film on the surface of their brine. The immediate fear is mold, which is indeed a sign of a failed, unsafe ferment. However, not all white films are created equal. It’s vital to distinguish between harmless Kahm yeast and dangerous mold. This distinction hinges on one core fermentation principle: maintaining an anaerobic environment. Mold is an aerobic organism; it requires oxygen to grow. If you see it, it means your vegetables were not fully submerged.
Kahm yeast is a common, harmless wild yeast that can also appear on the surface. It looks like a thin, flat, and often wrinkly white or cream-colored film. It might have a web-like or almost greasy appearance. While it can impart a slightly off, yeasty flavor if left to grow, it is not dangerous. It can be skimmed off the surface, and the ferment below is typically safe to consume. In contrast, mold is always fuzzy, three-dimensional, and often grows in distinct circular patches of white, green, blue, or black. If you see fuzzy growth, the entire batch must be discarded. Mold can produce mycotoxins that penetrate deep into the brine, making it unsafe even after the visible mold is removed.
The critical lesson here is prevention. The absolute best way to prevent both mold and excessive Kahm yeast is to ensure your vegetables remain completely submerged under the brine, depriving the surface of oxygen. This is why fermentation weights are not just an accessory; they are a key piece of safety equipment. The risk of ignoring these principles is real; a review of botulism cases found that faulty fermentation processes in Thailand, such as using insufficient salt or allowing oxygen exposure, were the direct cause.
Ultimately, a vigilant eye and a commitment to keeping things submerged are your best defenses, ensuring your jar remains a safe, anaerobic world for your beneficial bacteria.
Glass vs Plastic vs Ceramic: Which Crock Breathes Best?
The vessel you choose for fermentation is more than just a container; it’s the micro-ecosystem where your vegetables will transform. The primary function of any fermentation vessel is to facilitate an anaerobic environment while allowing the carbon dioxide produced during fermentation to escape. Different materials—glass, ceramic, and plastic—offer different advantages in managing this process, and the best choice depends on your batch size and commitment level.
Glass jars, like standard Mason jars, are the entry point for most beginners. Their main advantage is visibility; you can watch the bubbling activity and check for any issues without opening the lid. However, they require “burping” (manually releasing gas) or specialized airlock lids to prevent pressure buildup. Fido-style jars with a rubber gasket and clamp-down lid offer a self-burping mechanism, making them a more hands-off glass option. Ceramic crocks are the traditional choice for large-batch fermenting. Their key feature is a water-sealed moat around the rim, which acts as a natural airlock, letting CO2 out while preventing oxygen and contaminants from getting in. They also offer excellent temperature stability but are heavy, expensive, and offer zero visibility.
Food-grade plastic buckets are a lightweight, economical option for very large quantities, but they come with risks. Plastic can be scratched, and these microscopic scratches can harbor unwanted bacteria that are difficult to clean, potentially compromising future batches. There is also ongoing debate about potential chemical leaching into the acidic brine. For safety and purity, glass remains the top recommendation for home fermenters. It’s inert, impermeable, and easy to sanitize, providing a reliable and observable environment.
This comparative table breaks down the key features of each container type to help you make an informed decision.
| Container Type | Best For | Airlock System | Pros | Cons |
|---|---|---|---|---|
| Glass Mason Jars | Beginners, Small batches | Burping method or airlock lids | Visibility, affordable, easy monitoring | Requires daily burping, breakable |
| Fido-style Jars | Intermediate users | Self-burping gasket | No daily maintenance, reliable seal | More expensive, limited sizes |
| Ceramic Crocks | Large batches, enthusiasts | Water-sealed moat | Temperature stability, traditional method | High cost, no visibility, heavy |
| Food-grade Plastic | Bulk production | Various lid options | Lightweight, economical | Scratch risk harbors bacteria, potential leaching |
Your Fermentation Container Checklist
- Choose wide-mouth containers that allow your hand to fit inside for tightly packing vegetables.
- If using Mason jars, replace the standard two-piece metal lids with one-piece plastic storage caps to prevent rust from acid exposure.
- Opt for clear glass over colored varieties to allow for easy visual monitoring of the fermentation progress and brine clarity.
- Thoroughly inspect all containers before use, ensuring they are food-grade and completely free of any scratches, chips, or cracks that could harbor bacteria.
- Select a container size appropriate for your batch: quart jars are ideal for experimental recipes, while gallon jars are better suited for bulk production of staples like sauerkraut.
No matter the material, the ultimate goal is the same: create a sealed, oxygen-free environment that allows your ferment to thrive safely.
Why Your Kimchi Ferments Too Fast in Summer?
If you’ve ever made a batch of kimchi in July that turned to sour mush in three days, you’ve experienced the powerful influence of temperature. Along with salt, temperature is the most critical variable you can control to guide your ferment’s outcome. Fermentation is a biological process driven by living microbes, and their metabolic rate is directly tied to ambient temperature. Warmer temperatures accelerate everything, for better or for worse.
The fermentation process involves a natural ecological succession of different Lactic Acid Bacteria. In the early stages, species like *Leuconostoc mesenteroides* are dominant. They produce CO2 (the fizz), a bit of alcohol, and acetic acid, contributing to the complex, nuanced flavors of a great ferment. As the acidity increases, these bacteria die off and are replaced by more acid-tolerant species like *Lactobacillus plantarum*, which produce a much stronger, more one-dimensionally sour lactic acid. Research shows the optimal range of 60-70°F (15-21°C) allows for this slow, graceful succession, building layers of flavor while maintaining a crisp texture.
When temperatures rise above 75°F (24°C), this delicate dance is ruined. The process accelerates dramatically, skipping the nuanced flavor-building stage and jumping straight to dominant *Lactobacillus* activity. This results in a ferment that is aggressively sour, lacks complexity, and often has a soft or mushy texture. In summer, your kimchi ferments “too fast” because the heat is forcing a rapid, one-note fermentation. To counter this, you must find the coolest spot in your home—a basement, a pantry, or even use an insulated cooler with a frozen water bottle to create a micro-climate.

Case Study: Summer vs. Winter Fermentation Flavor Profile
In practical trials, two identical batches of fermented carrots were prepared. One was fermented in a summer kitchen at 80°F (27°C) and the other in a cool basement at 65°F (18°C). The summer batch reached a safe pH of 4.2 in just three days but was described as “aggressively sour” with a “limp texture.” The winter batch took seven days to reach the same pH but developed a “bright, tangy flavor with sweet undertones” and remained “perfectly crisp.” This demonstrates that slower, cooler fermentation is essential for developing complex flavors and preserving texture.
Controlling temperature isn’t just about preventing failure; it’s about elevating your ferments from merely edible to truly exceptional.
When to Stop Fermentation: The Taste Test vs The pH Strip
Knowing when your ferment is “done” is a crucial step that impacts both flavor and preservation. There isn’t a single universal timeline; the endpoint depends on the vegetable, temperature, and your personal taste. The two primary tools for making this decision are the subjective taste test and the objective pH strip. A true fermentation specialist uses both in tandem.
The taste test is your personal guide to flavor development. Beginning around day 3-5 (for most ferments at room temperature), you can start tasting a small amount daily. You’ll notice the flavor profile evolving from salty and raw to progressively more acidic and complex. This is your chance to decide what you enjoy. Do you prefer a mildly tangy pickle or a deeply sour sauerkraut? When the flavor hits a point you love, it’s time to move the ferment to cold storage (the refrigerator) to dramatically slow down microbial activity and lock in that flavor profile. Bubbling activity is another key indicator; vigorous bubbling in the first week shows active primary fermentation, which will slow down as the process matures.
However, taste alone doesn’t confirm safety. This is where pH strips are an invaluable tool for the cautious fermenter. They provide objective, scientific confirmation that your “pH firewall” is in place. As discussed, a pH at or below 4.6 is the universally recognized threshold for preventing botulism. You should see your ferment’s pH drop steadily in the first few days. By the time it tastes pleasantly sour, the pH will likely be well below 4.0, often in the 3.2-3.8 range. Using pH strips in your first few ferments is an excellent way to calibrate your palate, connecting the *taste* of a safe ferment with the *measurement* of a safe ferment. This builds immense confidence.
The following table provides general endpoint guidelines for common ferments, but remember to always trust the combination of your taste buds and your pH meter, as detailed in guidelines from the Manitoba government.
| Vegetable | Target pH | Fermentation Time | Taste Profile | Bubble Activity |
|---|---|---|---|---|
| Sauerkraut | 3.2-3.4 | 3-4 weeks | Deeply sour, complex | Slowing after week 2 |
| Cucumber Pickles | 3.2-3.6 | 3-6 weeks | Tangy, crisp | Active first 2 weeks |
| Kimchi | 3.8-4.2 | 3-7 days | Fizzy, pungent | Very active days 2-4 |
| Carrots | ~4.0 | 4-7 days | Sweet-tangy balance | Moderate throughout |
Once you’ve achieved your desired flavor and confirmed a safe pH, refrigeration is the final step, preserving your delicious, probiotic-rich, and perfectly safe creation for months to come.
Kefir vs Kombucha: Which Drink Has More Viable Probiotics for Skin Health?
While our focus has been on vegetables, the principles of managing microbial ecosystems extend to fermented drinks like kefir and kombucha. Both are celebrated for their probiotic content, but they originate from very different cultures. Water kefir is fermented with “grains” that are a symbiotic culture of bacteria and yeast (SCOBY), primarily composed of Lactic Acid Bacteria. Kombucha is also fermented with a SCOBY, but its culture is dominated by acetic acid bacteria and different yeast species. This fundamental difference in their microbial makeup influences their probiotic profile.
For skin health, the conversation often centers on the gut-skin axis, where a diverse and healthy gut microbiome can help reduce systemic inflammation that may manifest as skin issues. Kefir, with its high concentration of diverse Lactic Acid Bacteria strains (like *Lactobacillus* species), is often considered more aligned with typical probiotic supplements aimed at gut health. These are the same families of bacteria we cultivate in vegetable ferments. Kombucha, while also containing beneficial microbes, has a stronger presence of acetic acid bacteria, which gives it its characteristic vinegary tang.
Determining which has “more” viable probiotics is complex. The total count can vary wildly based on fermentation time, temperature, and the health of the culture. However, from a *type* perspective, water kefir often provides a wider array of the LAB strains most commonly associated with gut health benefits. Ultimately, both can contribute positively to gut diversity. The best choice is often the one you enjoy and will consume consistently, as regular intake is key to seeing any potential benefits for your skin or overall wellness.
The lesson from vegetable fermentation applies here: different microbes create different outcomes, and managing their environment is everything.
Agar Agar vs Gelatin: Which Texture Is Right for Vegan Mousses?
Exploring the world of food preservation and transformation naturally leads to a focus on texture. In lacto-fermentation, a primary goal is to preserve the crisp, snappy texture of fresh vegetables. We achieve this through proper salt concentration and temperature control, which prevents the cell walls from breaking down into mush. This is a form of texture *preservation*. However, in other areas of the culinary arts, the goal is texture *creation*, often through the use of gelling agents like gelatin and agar agar.
This presents an interesting contrast in principle. While a fermenter carefully manages microbes to keep vegetables firm, a pastry chef uses specific hydrocolloids to turn liquids into solids. Gelatin, an animal-derived protein, creates a soft, melt-in-your-mouth gel that is thermally reversible (it melts with heat). It’s the classic choice for panna cotta and traditional mousses, providing a rich, creamy mouthfeel.
Agar agar, derived from seaweed, is its vegan counterpart and behaves quite differently. It creates a much firmer, more brittle gel that is heat-stable up to 185°F (85°C). For a vegan mousse, agar must be used with a light hand to avoid a texture that is rubbery rather than airy. Often, it’s combined with other ingredients like cashews or aquafaba to replicate the creamy texture gelatin provides. The choice between them is not just about dietary preference; it’s a fundamental decision about the desired final texture: soft and creamy (gelatin) versus firm and sliceable (agar agar).
It highlights that whether preserving or creating, controlling texture is a deliberate act of scientific manipulation, just like controlling pH in a ferment.
Key takeaways
- Botulism is prevented by creating an acidic environment (pH below 4.6) where its spores cannot produce toxins.
- A 2-5% salt brine is the essential first step to favor beneficial Lactic Acid Bacteria (LAB) over pathogens.
- Controlling temperature (ideally 60-70°F or 15-21°C) is crucial for developing complex flavors and maintaining a crisp texture.
How to Heal Hormonal Acne by Changing Your Breakfast Habits?
The journey into fermentation often starts with a desire for better flavor or a new hobby but quickly evolves into a deeper appreciation for gut health. The connection between what we eat and our overall wellness, known as the gut-skin axis, is a field of growing research. It suggests that the health of our internal microbial ecosystem can have a direct impact on the health and appearance of our skin, including inflammatory conditions like hormonal acne.
Incorporating fermented foods into your breakfast is a powerful and practical way to support this connection. Starting your day with a source of live, diverse probiotics can help populate your gut with beneficial microbes. This isn’t about a “miracle cure,” but about consistently supporting your body’s systems. A breakfast of eggs with a side of kimchi or sauerkraut, or a smoothie with a splash of water kefir, introduces a wealth of Lactic Acid Bacteria. These microbes can help strengthen the gut lining, reduce systemic inflammation, and improve nutrient absorption—all factors that can indirectly contribute to clearer, healthier skin over time.
The key is diversity and consistency. Rather than relying on a single supplement, rotating through different fermented foods—sauerkraut, kimchi, pickles, kefir—provides a wider array of beneficial strains. By making these foods a regular part of your morning routine, you are doing more than just eating a meal; you are actively tending to your internal garden, which can yield benefits that are more than just skin deep.
By transforming your breakfast, you are applying the principles of fermentation not just to a jar of vegetables, but to your own health, making each meal a deliberate step towards greater well-being.